Website loading speed increase, Improve Page Speed for Faster Page Load Times…
How to Improve Page Speed for Faster Page Load Times
Improving page speed is crucial for providing a better user experience, and it can also positively impact search engine rankings. Here are several strategies you can employ to enhance your page speed:
- Optimize Images:
- Compress and resize images before uploading them to your website.
- Use modern image formats like WebP.
- Leverage responsive images with the
srcsetattribute to load different image sizes based on the user’s device.
- Enable Browser Caching:
- Configure your server to include proper caching headers for static resources.
- Utilize a Content Delivery Network (CDN) to cache static assets closer to the user.
- Minimize HTTP Requests:
- Reduce the number of elements on your page, including images, scripts, and stylesheets.
- Combine multiple CSS and JavaScript files into single files.
- Use CSS sprites to combine multiple images into a single image, reducing the number of HTTP requests.
- Minify CSS, JavaScript, and HTML:
- Remove unnecessary spaces, comments, and line breaks from your code.
- Use tools or build processes to automatically minify your CSS, JavaScript, and HTML files.
- Optimize Critical Rendering Path:
- Prioritize the loading of critical resources needed to render the above-the-fold content.
- Inline critical CSS or load it in the head to avoid render-blocking.
- Reduce Server Response Time:
- Optimize server-side performance by choosing a reliable hosting provider.
- Implement server-side caching.
- Optimize database queries.
- Use Asynchronous Loading for JavaScript:
- Load non-essential JavaScript asynchronously to prevent it from blocking the rendering of the page.
- Defer the execution of non-critical JavaScript until after the page has loaded.
- Optimize Fonts:
- Use system fonts whenever possible.
- Load only the font weights and styles you need.
- Consider using the
font-display: swapproperty to display a fallback font while custom fonts are loading.
- Enable Compression:
- Enable Gzip or Brotli compression on your server to reduce the size of transferred files.
- Minimize Redirects:
- Minimize the number of redirects as they increase page load time.
- Ensure that redirects are necessary, and if not, eliminate them.
- Optimize Third-Party Scripts:
- Limit the use of third-party scripts or defer their loading.
- Use asynchronous versions of third-party scripts whenever possible.
- Implement Lazy Loading:
- Lazy load images, videos, and other non-critical elements to defer their loading until they come into the user’s viewport.
- Prioritize Above-the-Fold Content:
- Load above-the-fold content first to provide a faster perceived page load time.
- Optimize and minimize the CSS and JavaScript needed for the initial rendering.
- Monitor and Analyze:
- Use tools like Google PageSpeed Insights, Lighthouse, or GTmetrix to identify specific issues affecting your page speed.
- Regularly monitor your website’s performance and make improvements as needed.
By implementing these strategies, you can significantly improve your page speed and provide a faster and more efficient browsing experience for your users.

How to optimize image file fast load image ?
Optimizing image files is an essential step in improving page load times and overall website performance. Here are several tips to optimize image files:
- Choose the Right File Format:
- Use the appropriate image format for your content. JPEG is ideal for photographs, while PNG is suitable for images with transparency, and WebP is a modern format that provides good compression and quality.
- Compress Images:
- Use image compression tools to reduce the file size without compromising quality. Online tools like TinyPNG, ImageOptim, or JPEG-Optimizer can help.
- Resize Images:
- Resize images to the dimensions needed on the web. Avoid using larger images and relying on HTML or CSS to resize them. This reduces both file size and load time.
- Use Responsive Images:
- Implement responsive images with the
srcsetattribute to provide different image sizes based on the user’s device and screen size.
- Implement responsive images with the
- Enable Image Compression on the Server:
- Configure your server to automatically compress images before delivering them to the user’s browser. This can be done using tools like ImageMagick or server-side modules.
- Leverage Image Sprites:
- Combine multiple small images into a single sprite sheet. This reduces the number of HTTP requests and speeds up the loading time.
- Optimize Image Delivery with CDNs:
- Use Content Delivery Networks (CDNs) to distribute your images globally, reducing latency and improving loading times.
- Implement Lazy Loading:
- Use lazy loading for images, especially for images below the fold. Lazy loading defers the loading of images until they are about to come into the user’s viewport.
- Set Image Dimensions:
- Always specify the width and height attributes in the HTML for each image. This helps browsers allocate space for the image during page layout, preventing layout shifts.
- Use Image Compression Formats:
- Choose compression formats that offer good quality at lower file sizes. For example, use JPEG for photographs and images with gradients.
- Optimize Image Delivery for Web:
- Enable browser caching for images to reduce the need for repeated downloads. Set appropriate cache expiration headers for static images.
- Remove Unnecessary Metadata:
- Strip unnecessary metadata from image files. Many images contain metadata (EXIF data) that is not needed for web display.
- Optimize SVG Files:
- If using SVG (Scalable Vector Graphics), ensure they are optimized. Remove unnecessary details and minify the SVG code.
- Audit and Test:
- Regularly audit and test your website’s images using tools like Google PageSpeed Insights, Lighthouse, or other image optimization tools. These tools can provide insights into opportunities for improvement.
Remember to strike a balance between image quality and file size, as excessively compressing images may lead to a loss of visual quality. Test the optimized images on different devices and screen sizes to ensure a good user experience.
Website loading speed increase ?
Follow the steps given below so that your website will load fast.
Method 1. – Create Website cache in user browser.
A long cache lifetime can speed up repeat visits to your page.
How to Create .htaccess file.
<IfModule mod_expires.c>
ExpiresActive On
ExpiresByType image/jpg "access 1 year"
ExpiresByType image/jpeg "access 1 year"
ExpiresByType image/gif "access 1 year"
ExpiresByType image/png "access 1 year"
ExpiresByType text/css "access 1 month"
ExpiresByType application/pdf "access 1 month"
ExpiresByType application/javascript "access 1 month"
ExpiresByType application/x-javascript "access 1 month"
ExpiresByType application/x-shockwave-flash "access 1 month"
ExpiresByType image/x-icon "access 1 year"
ExpiresDefault "access 2 days"
</IfModule>
The above code is created by creating a file of .htaccess, put it in it and save it, your Leverage browser caching problem will be solved.
Method 2. – Enable GZIP Compression to Speed Up Your Site.
this script compress your all website script use for increase loading speed.
Gzip compression on a website can be enabled using two methods – installing a WordPress plugin or editing the .htaccess file.
How to Create .htaccess file.
<ifModule mod_gzip.c>
mod_gzip_on Yes
mod_gzip_dechunk Yes
mod_gzip_item_include file \.(html?|txt|css|js|php|pl)$
mod_gzip_item_include mime ^application/x-javascript.*
mod_gzip_item_include mime ^text/.*
mod_gzip_item_exclude rspheader ^Content-Encoding:.*gzip.*
mod_gzip_item_exclude mime ^image/.*
mod_gzip_item_include handler ^cgi-script$
</ifModule>
GZIP is a compression technology frequently used for transferring data quickly over the internet. “GZIP” refers to a compression method, software used to compress files with this method, and the file format that results from GZIP compression (usually indicated by the file extension . gzip).
Method 3. – Fix Properly size images.
Serve images that are appropriately-sized to save cellular data and improve load time.
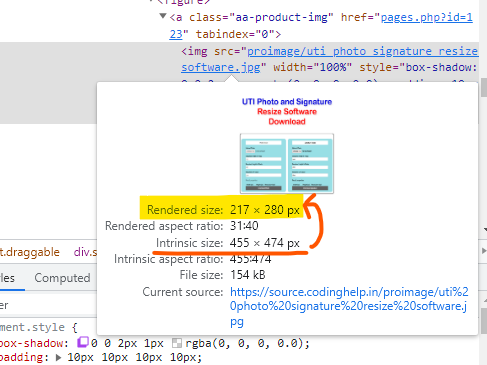
When you open the website and go to Inspect and click on the URL containing the image, then your image should be of the same size as you see in the Rendered size, the Width and Height that you see in the Intrinsic size. The size of the size in which you have uploaded, now you are getting to see the Height and widht in the Rendered size, resize it and then upload / replace it.
Method 4. – How to use media=”all” in .css link
The media="all" attribute is used in the <link> and <style> HTML elements to specify the media type for which a particular CSS file or block of styles should apply.
In the context of the <link> element for stylesheets, the media attribute allows you to define conditions under which the linked stylesheet should be applied. The value “all” is a media type that applies the styles to all media types, regardless of the device or output medium.
Here is an example of using media="all" in the <link> element:
<link rel="stylesheet" type="text/css" href="styles.css" media="all">
In this example, the styles.css file will be applied to all types of media, including screen, print, speech, etc.
Similarly, when used in a <style> element in the HTML document, it sets the media type for the enclosed styles. For example:
<style media="all">

body {

font-family: Arial, sans-serif;

}

/* other styles */

</style>
In this case, the styles within the <style> block will be applied to all media types.
Using the media attribute helps in creating responsive designs where you can have different stylesheets for different media types (e.g., screen, print) or specify styles that should only apply in certain situations. If the media attribute is omitted, the default is usually “all”, meaning the styles will apply to all media types.
Method 5. – How to use loading=”lazy” in img tag
The loading="lazy" attribute is used in the <img> (image) and <iframe> (inline frame) HTML elements to enable lazy loading for these resources. Lazy loading is a technique that defers the loading of an image or iframe until it is about to be visible in the user’s viewport. This can help improve page load times, as only the content that the user is likely to see immediately is loaded initially.
Here’s an example of how to use loading="lazy" with an image:
<img src="example.jpg" alt="Example Image" loading="lazy">
And with an iframe:
<iframe src="https://www.example.com" loading="lazy"></iframe>
In both cases, the loading="lazy" attribute is added to the element. When the browser encounters this attribute, it knows to defer the loading of the resource until it’s needed, based on the user’s scrolling behavior.
It’s important to note that the loading attribute is supported in modern browsers, and it’s a useful tool for optimizing the loading of images and iframes, especially in scenarios where there are many images or iframes on a page.
Keep in mind that while loading="lazy" can significantly improve page load performance, it might not be suitable for all situations, especially when precise control over when and how resources are loaded is required. Additionally, always provide appropriate alternative text (alt attribute for images) for accessibility purposes, whether or not lazy loading is used.
Method 6. – Target Specific country and language for website ranking hreflang=”en-in” ?
The hreflang attribute is used to indicate the language and regional targeting of a webpage, helping search engines understand which language versions to display for users in different regions. If you want to target a specific country and language for your website ranking, you can use the hreflang attribute in the <link> tag within the <head> section of your HTML document.
For example, if you want to target English speakers in India, you can use the following:
<link rel="alternate" href="https://www.yourwebsite.com/en-in/page" hreflang="en-in" />
Explanation:
rel="alternate": Indicates an alternate version of the page.href: Specifies the URL of the alternate version.hreflang="en-in": Specifies the language and regional targeting. “en” is the language code for English, and “in” is the country code for India.
You can include multiple hreflang tags for different language and regional variations of your content. Here’s an example for targeting English speakers in the United States:
<link rel="alternate" href="https://www.yourwebsite.com/en-us/page" hreflang="en-us" />
Additionally, if you have multiple language versions of a page, you can specify them like this:
<link rel="alternate" href="https://www.yourwebsite.com/en/page" hreflang="en" />

<link rel="alternate" href="https://www.yourwebsite.com/es/page" hreflang="es" />
Make sure to place the hreflang tags in the HTML <head> section of each page, and ensure that the URLs specified are valid and accessible.
Note: While hreflang is a useful signal for search engines, it’s just one of many factors that can influence search rankings. It’s important to provide high-quality, relevant content and follow other best practices for SEO (Search Engine Optimization).
Method 7. – How to use Async and Defer in Script tag ?
The async and defer attributes are used in HTML to control how scripts are executed in relation to the loading of the HTML document. Both attributes are applied to the <script> element.
-
asyncAttribute:- When a script has the
asyncattribute, it will be executed asynchronously. This means that the script will not block the rendering of the HTML page, and it will be executed as soon as it’s available, without waiting for other resources to finish loading. - Example:
html<script async src="script.js"></script>
- Use
asyncwhen the script doesn’t depend on the order of execution and can run independently.
- When a script has the
-
deferAttribute:- When a script has the
deferattribute, it will be executed in order after the HTML document has been fully parsed. This ensures that the script is executed in the correct order and won’t block the rendering of the page. - Example:
html<script defer src="script.js"></script>
- Use
deferwhen the script relies on the order of execution or when the script needs access to the fully parsed HTML document.
- When a script has the
Here’s a comparison:
-
If you use both
asyncanddefer:- Scripts with the
asyncattribute are executed as soon as they are available. - Scripts with the
deferattribute are executed in order after the HTML document is fully parsed.
- Scripts with the
-
If you use neither
asyncnordefer:- Scripts are executed synchronously, and they block the parsing of the HTML document.
-
If you use both
asyncanddeferon the same script tag:- The
asyncattribute takes precedence, and the script will be executed asynchronously.
- The
Example using both async and defer:
<script async defer src="script.js"></script>
In this case, the script will be executed as soon as it’s available, and it will maintain the order in relation to other scripts with the defer attribute.
Choose async or defer based on the script’s requirements and whether it needs to be executed independently or in order. If the order doesn’t matter, you can use async for faster loading. If order matters, use defer. If you’re unsure, it’s generally safe to use defer for external scripts to ensure they execute in order.
Method 8. – Convert All Image in webp type image format ?
If your image takes a lot of time to load then you can convert it to .webp. By doing this your image will start loading faster. By doing this the image size will also be reduced without reducing the quality.