If you want to take any API from API-DHBOSS and you want to take Trial of that API before taking API,
Live Api Testing Real Time dhboss api
Then how can you take it, so that you can know whether API is working or not as well as what is the output in API You are getting all this information only when you call the API, in such a situation, without activating the API, we are going to know about how to take a trial from the Demo API.
What is Needed for API Trial
To take API trial, your 3 steps should be complete, Only then you can take trial of any API, what are the steps, their information is given below.
- Step 1:- You must be registered on API-DHBOSS
- Step 2:- eKYC should be completed on API-DHBOSS
- Step 3:- 100+ amount should be available in the wallet in the account of API-DHBOSS
If you have completed all the three steps, then you can follow the steps given below to take trial of any API.
How to do new Registration on API-DHBOSS ?
Click on the link below to make a new registration on API-DHBOSS
- Step 1:- For API-DHBOSS https://api.dhboss.com/dashboard/register you can register by clicking on this link.
- Step 2:- Then you have to submit the registration page completely, you will get the user and password.
- Step 3:- You can click on CLICK HERE button to see further process
API-DHBOSS already has an article about how to do a new registration, you can see that
How to complete eKYC of API-DHBOSS
If you want to complete kyc of API-DHBOSS or update your profile then you can follow the steps given below
If you do not understand how to complete e kyc on api-dhboss then https://codinghelp.in/how-to-complete-e-kyc-for-api-dh-boss-api-dhboss-com/ You can visit this link, here we have given complete information about how to complete kyc, so that you can use API by completing your kyc without any problem.
How to add balance in api-dhboss wallet
If you want to add payment in API-DHBOSS Wallet then follow the steps given below
- Step 1:- First of all you have to login to this “https://api.dhboss.com/dashboard/login” with User and Password
- Step 2:- In API-DHBOSS, in the menu list on the left side, click on the option of “Add Wallet“.
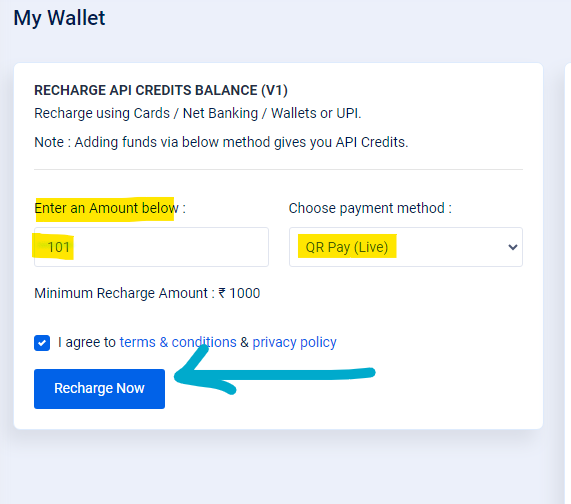
- Step 3:- Enter an Amount below: You will get 1000 written in it, you have to remove it and make it 101, immediately click on Recharge Now Button
- Step 4:- Then you will have a QR Code Display in front of you, you have to make the payment, after that the payment will be added to the wallet immediately.
Live Api Trial in Api-DHBoss ?
To take a trial of any API, first you have to generate a demo API key, for that there are some processes below, after that you can take a trial of the API.
Step 1:- In API-DHBOSS, in the menu list on the left, click on the option for “Demo API Key“.

Step 2:- “DEMO API KEY” – Here you can get Demo API Key only when your account’s kyc is complete and Fix 100 rupees is available in second Wallet, only then you will get Demo API key and also you will be told how much API call you can make.
Step 3:- “TRIAL HIT ALLOWED” – will show some number here as many times as the number comes, you can call any API through Demo Api, this is just to check demo, you can call any number of API from Live Api no limit
Live Api Testing Process
After the demo api key is generated, you can do live testing of any API by following the steps given below.

Step 4:- In API-DHBOSS, in the menu list on the left, click on the option for “Live Api Testing“.
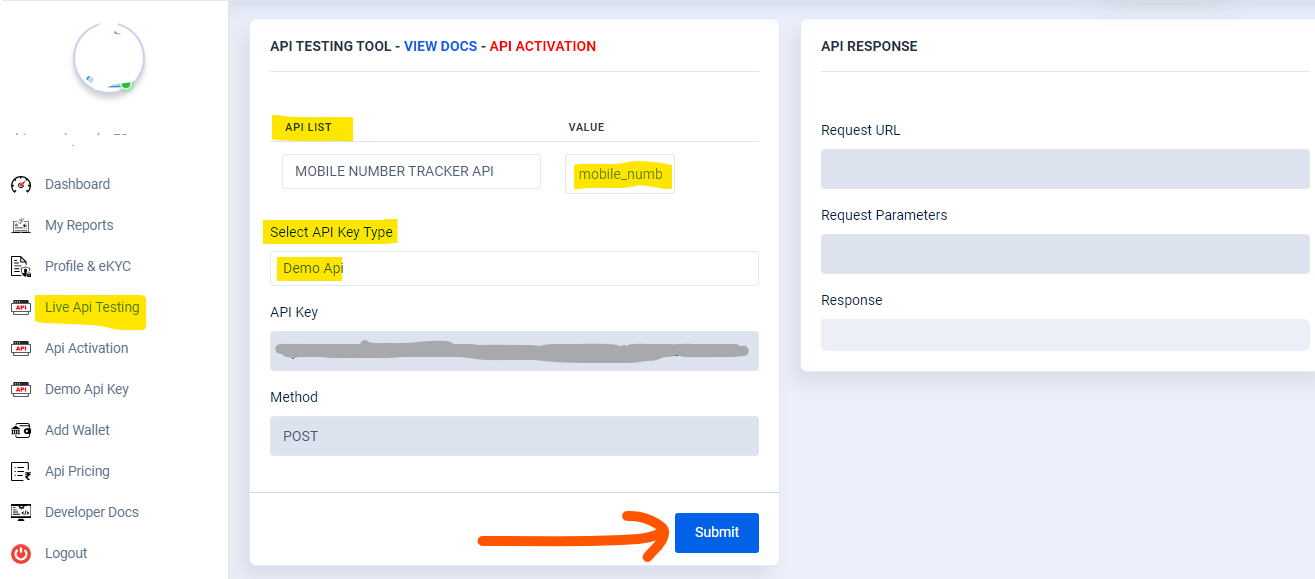
Step 5:- In “API LIST” you will find the list of all APIs available on dhboss, select the name of the API you want to check
Step 6:- Before calling an API, you have to see what response you will get in this, then you have to click on “VIEW DOCS” at the top, after selecting the API name.
Step 7:- “VALUE” Whichever API you select, many fields open in front of you to collect the important information required to call that API, in which you have to give the information to be asked.
Step 8:- In “Select API Key Type” you have to select Demo Api, if you are checking trial of any API, then if you check with Live Api, then you are not able to check because for that that API should be active on your account. To call an API from Live api, you have to buy that API only then you can check with live api otherwise you have to select Demo api.
Step 9:- After entering all the important information, you have to click on the submit button.

Step 10:- Then you will get the output of that API in “Response“, something like this you can take trial of any API.

Live Api Activation Process
After taking the trial of the API, follow the steps given below to activate the API or take the API
Step 11:- Select the API you want to take and click on the red button with “API ACTIVATION“.

Step 12:- To call any API from Live API, you must first activate that API, for that you have to click on the option “API ACTIVATION” in the menu bar.
Step 13:- The api activation page will open in front of you, now you have to select the API you want to activate in the “API LIST“.
Step 14:- In “This API Activation Charge” you will have an amount displayed which will be deducted from your wallet on activation of that API so balance must be available in the wallet to activate the select API.
Step 15:- “API Hit Charge” will contain the charge that will be deducted from the wallet on calling the select API and display amount whenever the API call is made
Step 16:- “Pay and Active” If you want to activate the select API, then you click on the pay and activate button, the API activation charge will be deducted from your wallet, then you can call that API.
Something like this you can take any API trial, you can activate the API if you like it, but you will have to pay some charge on API hit, you can make unlimited calls to API, there is no limit on it, but you will have to pay some charge on hit.