Today in this article, we are going to know how to register a new account on api.dhboss.com so that you can use the API available on api.dhboss.com.
What is Api DhBoss?
Api DHBoss is an Api Provide platform where you get to see different types of Api, which you can use in your website, due to which your business will grow a lot. Here you get all types of API.
Which APIs can be found on Api-DHBoss
All important APIs can be found on Api-DHBoss, such as PAN Card, Aadhaar Card, GST, Parcel Track, Vehicle Details, Driving License Details, Mobile Number, etc.
You can visit https://dhboss.com/ to check the list of which APIs are actually available now, here you will get the option of “Available API List”, here you will get the API list, here you will get API cast is also visible

Api Name :- Here you are being told the API name, you can see the API of your choice.
Custom Plan Hit Charge :- What is the meaning of 999/0.35, in this you are getting to see two charges, if for example you have to type “AADHAR BASED PAN MAKING CHECK API” If you like this API then you have to pay 999 rupees to activate this API, only after that you can call this API. The charge of 0.35 rupees is API hit charge, means if you If you call the API, then on calling you will be deducted a charge of 0.35 rupees from the wallet of your account, so you have to pay two charges, first you want to call the API or activate the API you want to take. To make a purchase, you have to pay Api Activation Charge, which you have to pay once, the second charge is that when you call this API, that is, when you run the API, then you will get Hit Charge of that API on every Success Response. This charge will be deducted from the wallet of your Api Account, so it is necessary to have balance in the wallet, otherwise the API will not work.
If we like any API and we want to see which response will be returned in it ?
How can you see what response you will get before activating an API or calling that API?
If you like an API, but you have to see that if we activate that API, then what response we will get when we call that API, we want to check all this before activating the API.
For example, if we like this API “MOBILE NUMBER TRACKER API” and we want to check the Output Response of this API, then how to see, for this you have to follow the steps given below, in which it is told that on which API you will get to see which response .
Api Documentation > To check what output will be available on which API, you click on this link https://dhboss.com/ and the website will open in front of you, then you have to click on the “Api Documentation” button. Then the API list will appear in front of you
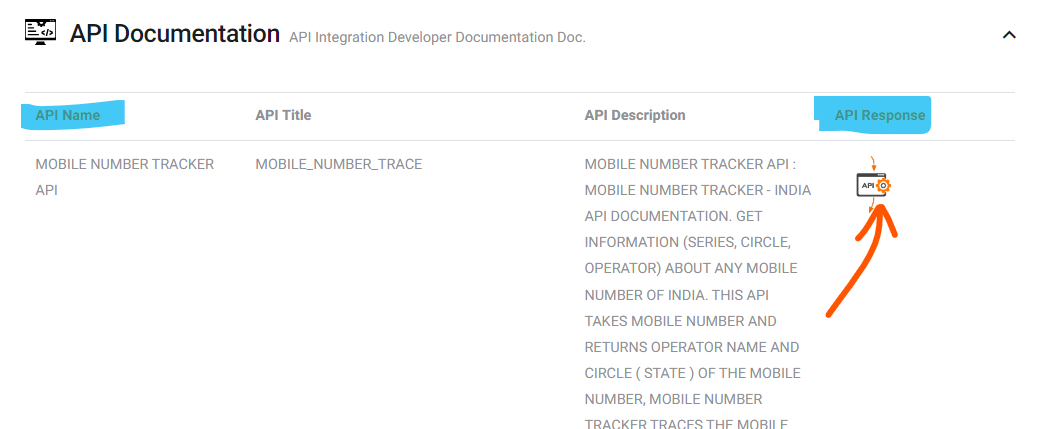
For example, if we like this API “MOBILE NUMBER TRACKER API” and we want to see its Output response, then in the section “API Response” you will see a logo with the name of the API. click on api icon.
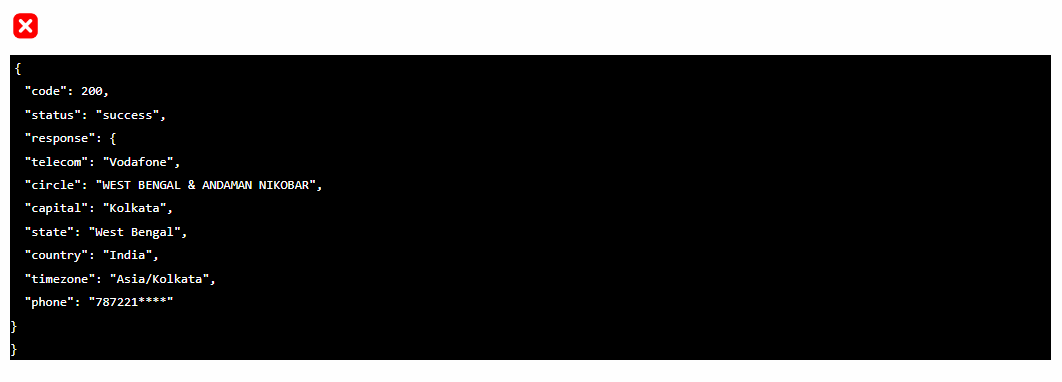
Then the response of the output you will get on calling that API will come in front of you, so that before taking the API, you will know what you will get by calling that API.
How to Register Account on API DH Boss?
Follow the steps given below to create your Account Register on API DH Boss
Step 1:- Click on https://api.dhboss.com/dashboard/register to register on API DH Boss.

Step 2:- The registration page will open in front of you, you have to fill and submit this registration form, Full Name – first of all enter the legal name of the applicant.
Step 3:- Email Address Enter the email address of the applicant which he/she wants to use to login to this website.
Step 4:- Mobile Number – Enter the existing mobile number of the applicant here.
Step 5:- Username* – Username will be auto entered as the applicant enters his email, you just have to enter the email.
Step 6:- Password – Here enter a strong password with which you want to log in

Step 7:- Setup Website Name :- Here enter the name of your website on which you are going to install the API.
Step 8:- Setup Website URL:- Here enter the URL of your website on which you are going to install the API.
Step 9:- Website Hosting IP :- The website on which you are going to install API is hosted on which hosting, enter the IP address of that hosting which you will get to see in Cpanel
Step 10:- Where do you hear about us?* – Enter the name of the platform through which you have come here on this website, like you have come from Google, YouTube or any other platform, you can also write Google.
Step 11:- Verify Recaptcha then click on Create Account button
As you fill and submit this registration form, you will get the message of Successfully, the user will be your email and the password you have entered will be the same in the password box, then you have to sign in.
How to login on API DH Boss?
As you register an account on API DH Boss by following the steps mentioned above, then you get the login ID, then you can log in, its process is given below.
Step 1:- To login to dhboss https://api.dhboss.com/dashboard/login click on this link

Step 2:- Email / Username – Enter your email here that you provided while registering
Step 3:- Password*Forgot Now – Here enter the correct password which was given while registering your ID, if you ever forget your password, then you can click on the Gmail logo below and log in without the password.
Step 4:- I’m not a robot – Solve this Recaptcha like right icon comes here then you have to click on Sign In Button
Step 5:- If you forget the password or the Recaptcha is not solved, then you can sign in with the Register email by clicking on the Gmail or Google icon below, it does not ask for a password or OTP.
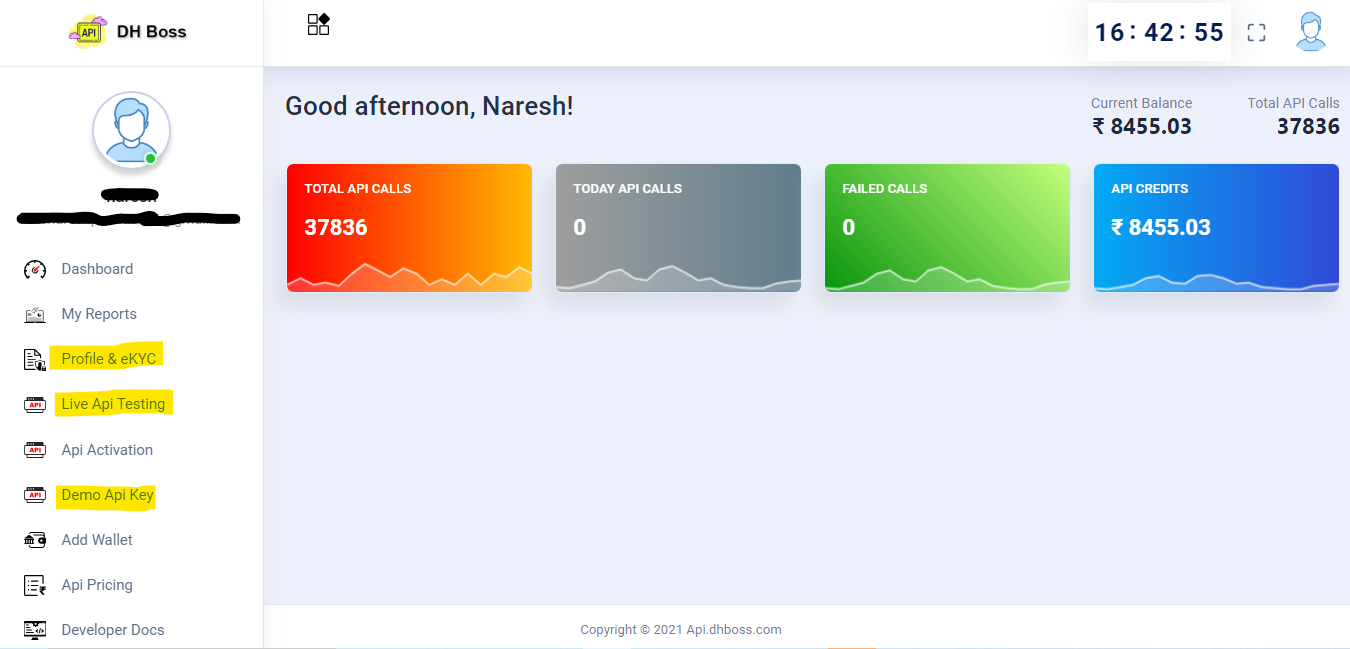
Step 6:- After logging in on DHBoss, you have to do three things first eKYC Complete, second Demo Api Key Generate, third Demo API Live Api Testing of any API.
Step 7:- If you want to complete eKYC on Api DhBoss then click on CLICK HERE Button, here is how you can submit ekyc.
Step 8:- Demo Api Key – Click on the option with Demo Api Key. Before generating this API, you have to complete eKYC, only after that you can take trial of any API. For second demo API, you will have to add Rs.101 in Wallet to add payment to Wallet. Click on Add Wallet Button and add payment when Ekyc is complete as well as Rs 101 is entered in the wallet then you have to click on Demo Api Key option.
After the Demo Api Key is generated, you can hit any API 10 or 20 times, it is given only to check the demo so that you can check that API before activating any API.
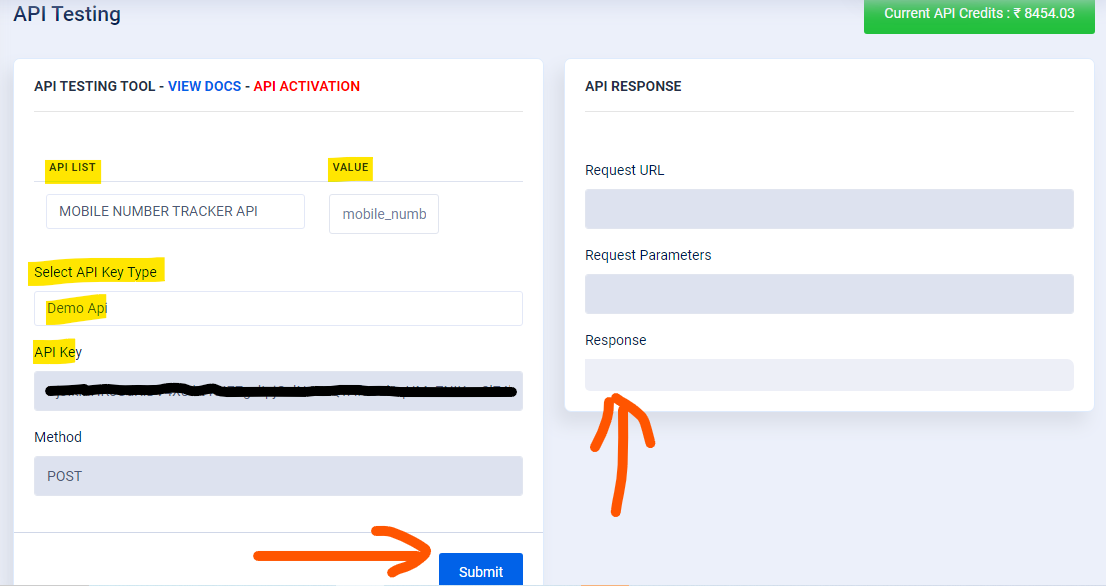
Step 9:- Live API Testing – As you click here, you get to see this in front of you, here you select the API which you want to check, then the value required to call that API will be asked from you, like If you call mobile track api then you have to enter mobile number then you have to select demo api in “Select API Key Type” then submit
Step 10:- Then you will get to see the output of the selected API.
Step 11:- If you check the demo of an API and you like the demo and you want to activate that API so that you can install it on your website, then for this you have the option named “API ACTIVATION” above, from there you check Can do, on “VIEW DOCS” you get Doc File from where you will get the file of how to call API
Something like this you can register api dhboss par, as well as log in like this, all the important information related to it has been given to you.