Today, what are you going to know about Aadhar Card Print Api, how you can check the complete data of Aadhar card with Aadhar Card Verification API, for this you will have to give Aadhar card number and fingerprint of Aadhar holder.
Aadhaar Verification Using Biometric API – Aadhaar Verification Online API. Online Aadhaar card verification tool is simple to use and integrate. All you need is your Aadhaar card number and fingerprint, the Government of India has issued a regulation that allows telecom companies and banks to use the API to carry out user verification and authentication. Best Aadhaar Fingerprint Verification API Provider Company, Aadhaar Enabled Biometric Device Assists Government in the Process of Enrollment and Verification of an Individual through Biometric Fingerprint Scanner – Api.Dhboss.Com
If you are working on such a website, in which you have to check the data of Aadhaar card, then how can you get Aadhaar Card Verification API for that, in which you can put it in your website.
AADHAR VERIFICATION USING BIOMETRIC API
If you want Aadhaar Card Verification API, then how can you get it, for this you can follow the steps given below –
Step 1:- If you want to take Aadhar Verification API, then you can activate Instant API from dhboss.com at a very low price and use it as much as you want.
Step 2:- First let’s know how you can activate the API and how much you have to pay.
Step 3:- What response will you get to see in the Aadhaar Verification API, in this you will get to see all the data that comes printed in an Aadhaar card
Step 4:- To get the API of AADHAR VERIFICATION USING BIOMETRIC API, you can create your account by clicking on api.dhboss.com, how to activate the API.
Step 5:- Like you can register your DHboss Account by clicking on the link given above, then you have to login.
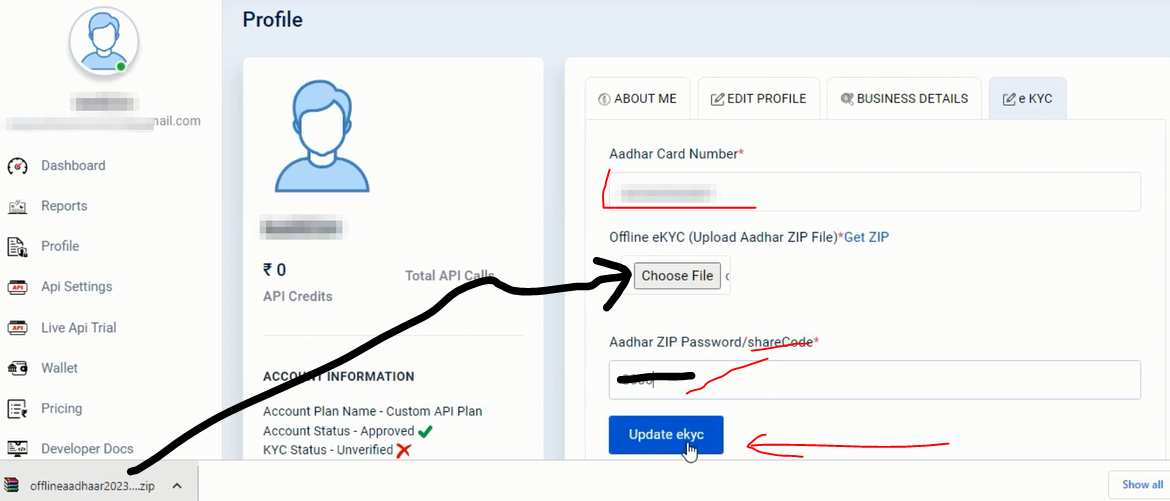
Step 6:- To activate any API or call Demo Api, you must first complete KYC of DH-Boss, only after that you can call any API, click on CLICK HERE button to complete KYC. from which you can submit KYC.

Step 7:- When you check by clicking on Profile & eKYC button, you will see Account Status -Approved, KYC Status – Verified
API Calls – Active All this should be there then only you can be able to call anyone.

Step 8:- With Demo Api Key you can call anyone without activating it but in this you get Limit, so use it only to take Demo of any API, for this Demo API Key you have to keep 100+ amount in wallet Only then it will be Demo API Key Display.
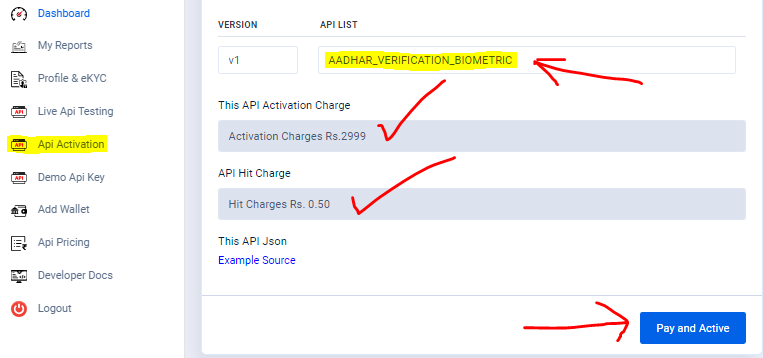
Step 9:- If you want to install an API in your website, then you have to activate that API, for this you have to click on the API Activation button, then you have to activate the API you want to activate, select AADHAR_VERIFICATION_BIOMETRIC, Pay and Active You have to click on the button, then the amount of charge being told will be deducted from your wallet.
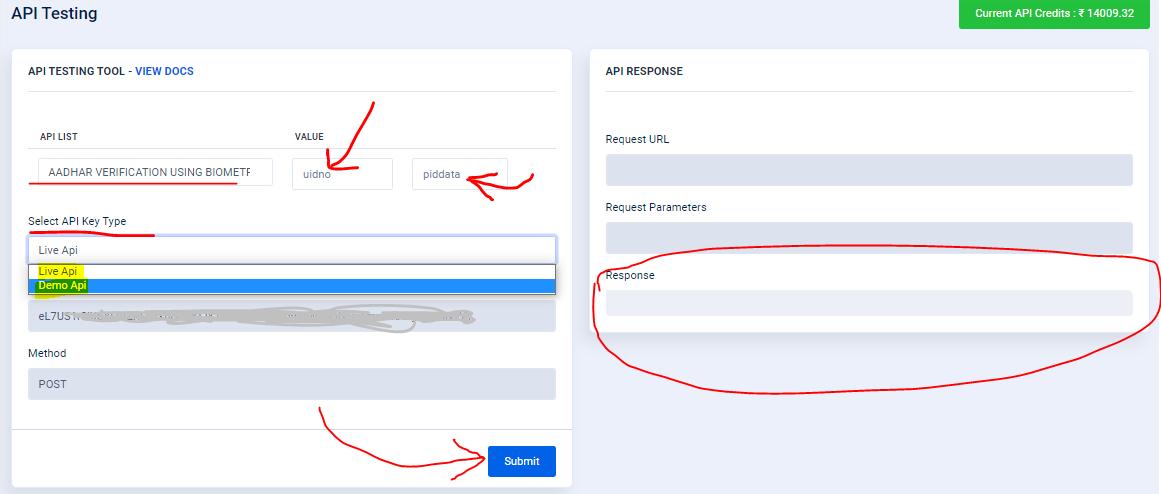
Step 10:- Live Api Testing – Select the API of which you want to take Trial, Enter 12 Digit Aadhar Number in Value, paste the PIDData which you get after scanning finger print, then click on Submit button.
Select API Key Type – You will see Live Api and Demo Api two Live Api – You can call an API only when you have activated that API, Demo Api – With this you can call that API without activating it. Can take Trial of API.
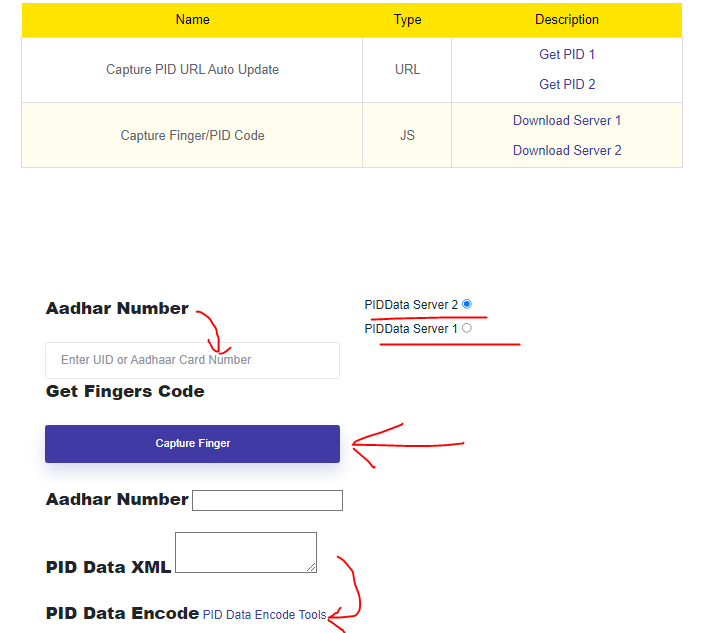
Step 11:- How to get PIDData, for this you have to click on CLICK HERE Button, then option will come in front of you to get PID Data at the bottom, enter Aadhaar number, click on Capture Finger Button then a code will come in PID Data XML , After scanning the finger, then you will have to encode that code in PID Data, then the new code that will be received, after encoding that code has to be given in Live Api Testing.

Step 12:- You will get some such data when you call the API by giving Generate PID Data from Aadhaar number and Fingerprint.
Something like this you can take Aadhaar with Photo Verification Api.